Wednesday, July 3, 2019

Engaging and Keeping the Attention of Students

This is my Week 2 post from our 'Don't Ditch That Tech' book study.

-------------------------

In "Don't Ditch That Tech", the authors state that "What we do know from the science of learning is that, at every stage of the learning process attention is a central component in moving skills and content to the long term memory. For us as practitioners, this means that we should not just seek to grab attention at the beginning of a lesson, but we should strive to keep our students engaged throughout our time with them." (Miller, 2019)

One of the ways we lose student engagement is when a learner encounters a barrier to accessing content. This may be difficulty decoding words, typing a response, or understanding vocabulary in the text. When a student encounters a barrier they can get frustrated, lose interest and attention wanders. When we design a lesson to remove these barriers, then all students have access thus increasing their rate of engagement.

Integrating fun, new apps and tools into a lesson is always exciting, but for this post I wanted to focus helping remove barriers and maintaining student interest and engagement with content. 

Presenting content to students in only one or two similarly styled ways may present barriers for learning and lead to disengagement. 

To overcome this barrier, teachers can use technology to provide options for students when dealing with digital content. 


OPTION 1 - Provide multiple formats to access content - Here are examples of how to do this with the science concept: States of Matter

    • Video

    • Text
                  States of Matter - CK12 Online Textbook
    • Multimedia/Interactive
                  Phet - free online simulations
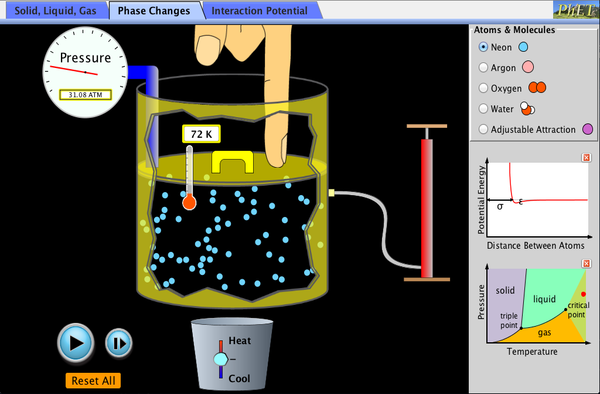
                                                                           States of Matter

Click to Run


OPTION 2 - Present information digitally and give students the opportunity to customize display             


(example - sharing a copy of slides and letting students change look)
    • Push out your slides of class notes to students in Google Classroom BEFORE the lesson, make a copy for each student. Encourage them to change or enhance the notes to meet their needs.

  • Offer ways of customizing the display of information
    • When using Google Docs let students customize the display of information.


Try the Read&Write Chrome Extension which has many tools including screen masking.


If you want to learn more about removing barriers to learning here are some resources from the super smart Zach Smith.


Tools and Strategies to Address Barriers (Video 1:38)


---
MILLER, MATT. DON'T DITCH THAT TECH differentiated instruction in a digital world;differentiated instruction in a digital world. S.l: DAVE BURGESS CONSULTING, 2019. eBook.

Tuesday, July 2, 2019

Hello Universally Designed Leadership!


This is Week 1 of my Universally Designed Leadership course with Dr. Kristan Rodriguez, being offered through Novak Consulting. If you want to know a little more about me and why I am taking this course feel free explore below.

Rae Fearing


Options for learning about Rae 😁

Read the post below 
Watch a video of me answering the questions in this post
View my About Me Page 
Ask me questions!

--------------------------------

What is your name: 

Rae Fearing

Describe your day job: 

My position is split between Director of Innovation and Special Projects for Del Norte County Office of Education and as Principal of Gasquet Mountain Elementary School which is a STEM school in Del Norte County, California. As Director of Innovation, I support teachers, administrators and students in the effective integration of technology to support learning. I also implement ideas to promote new and innovative teaching practice. Del Norte County has one school district with approximately 4000 K-12 students and 240 teachers. My work involves building structures and supports to increase academic achievement and engagement through collaboration, communication, creativity, and critical thinking. Some of my projects include:

  • GSuite for Education to increase collaboration and communication
  • EdCamp to support collaboration and learning
  • Breakout Edu to support innovative classroom practice
  • Science for all through implementation of California's new Next Generation Science Standards
  • STEAM Education (science, technology, engineering, art, and math) including our annual STEAM Expo
  • No Worksheet Week (and month) to support innovative teaching with Matthew Weld
As a Principal of a K-8 STEM school I have built a STEM program with an emphasis on Environmental Science to provide rigorous learning combined with engineering and project based learning. Together with my teaching staff we work to create student centered learning environments that include real world applications. Our goal is to give students the knowledge and skills they need to be informed citizens and pursue STEM subjects in college or as a career.

What motivates me as a learner?

Caring about the subject I am learning.
Achieving and earning recognition (points, grades, achievement levels, etc.)
Feedback (Teacher to student, peer to peer)

What motivates me as a leader?

Helping others
Seeing accomplishments reached
Getting better

Why are you taking this course?

I have been a UDL fan since I first heard Katie Novak speak. She even stopped by a UDL focused Twitter Chat I hosted once for #CAedchat! Katie has said she learned from Dr. Kristan Rodriguez, so I for that reason I jumped at the chance when I saw this course. I am taking this course to help me better support my school and my district as we move into UDL implementation and improved learning for all of our students.

What do you hope to gain from this course?

My goal is to increase my knowledge and move further into my own understanding of UDL. I want to support not only my own school site, but also all teachers and school in my district as they start on their UDL journey.

What assets and challenges do you bring to our new community of learners?

Experience with online learning both as a student and as a teacher/facilitator of learning
Basic knowledge of UDL
Enthusiasm for connecting and learning from others


Wednesday, June 26, 2019

3 Ways I Want To Improve What I Do, Digitally

This is part 1 of a 4 part series of blog posts centered around a summer book study with my PLN. The book we are reading is Don't Ditch That Tech, by Matt Miller.

_____________________________________________________

After reading the first two chapter's of Don't Ditch That Tech, by Matt Miller. I was inspired to learn a few new tech tools and revisit some tools I haven't used in a while.  As a school administrator I work with teachers and administrators daily. Here are three ways I want to improve what I do, digitally.

1. Increase personalized learning with interactive tutorials 
Tech tool: iorad the free tutorial builder

Image result for iorad logoWith this free extension you can build tutorials with any app. One of my favorite features in this app is the way it easily builds the tutorial for you. Genius! No more trying to record my screen while trying to highlight locations and where to click. The app does it for you and you can easily edit any step. I have made many 'how to' videos for teachers and this app just saved me tons of time.

Here is my first tutorial with iorad - a quick tutorial about how to create a blog new post with Blogger. I really like how you can customize the highlight boxes and text. It will even auto generate the voice over! For those days when you just don't feel like talking.

This is a great tutorial maker. I like that it is a Chrome extension, students could use it to and create helpful tutorials for concepts they have mastered.

13 STEPS

1 In your Google Apps account, click on the apps waffle - usually in the top, right corner.
Step 1 image
2 Find Blogger in the apps list.
Step 2 image
3 Click Blogger, you may have to scroll down to find it.
Step 3 image
4 This will take you to your list of blog posts, if you have any. Click New post.
Step 4 image
5 Click on Title and be sure to enter a catchy title for your blog post.
Step 5 image
6 Click Title
Step 6 image
7 Type your Title
Step 7 image
8 Here you can type the main body of your blog post.
Step 8 image
9 Begin typing to create your post.
Step 9 image
10 Click Save, but Blogger will also auto save as you go.
Step 10 image
11 Click Preview 
Step 11 image
12 Preview will let you see what the post will look like to viewers. This is helpful to check formatting and images.
Step 12 image
13 That's it. You're done. Start blogging!
Step 13 image

Here's an interactive tutorial for the visual learners


2. Increase Student Content Creation
Tech tool: Thinglink 

Thinglink was founded in Finland in 2010. It has been growing in the USA since 2013. With Thinglink students create highly engaging and dynamic images that can be shared anywhere in the world. Students can create or find an image, upload it to Thinglink and then tag it with text, web links, videos, or images. You can even create augmented 360 videos in Thinglink. What a great way for students to create a virtual tour of their school or classroom! This tool can be used in any subject area and allows teachers to modify and re-design their assignments. With a $35 dollar premium account, teachers can manage students and help them master digital skills to help them in future college or career endeavors.

Here are some ways I have used Thinglink:


  • To augment my presenter promo slide for Fall CUE


  • Highlighting Women in Science


See more examples here

Want to try it? Here are 5 ways to use Thinglink in the classroom right now:

  1. Book character bios - students create or find an image of the character and tag it with related information and media that they find on the web or create themselves. 
  2. Maps - have students tag a map with a "Top 5" - top ... engineering feats in the world, battle sites, Civil Rights hotspots, scientists in the world...you get the idea.
  3. Close read of an image - practice close reading skills with an image, have students leave a tag of an observation they make of the image, you could also do this with a piece of text.
  4. Life Cycles - have students create stop motion animations of a life cycle and tag an image of the life cycle with the videos they create.
  5. Photo walk - students can create a collage of images they take and then tag the images with location, description, interpretation, etc.

3. YouTube Playlists for Content Curation

Tech tool: YouTube

Curating more content for teachers is another way I can improve what I do. YouTube Playlists let me assemble videos for any topic I want and then easily share the list with teachers. One thing I love about this is that YouTube allows me to centralize my content for easy accessibility. I just have to make sure teachers follow me on YouTube and then they can easily find any playlist I have created.

Playlists I have created so far:


Wednesday, April 3, 2019

You Must Ask The Right Questions

Take a lesson from Dr. Lanning of iRobot.
If student responses are limited,
you must ask the right questions!
Are you are getting little or no responses from your students about their learning? Do students ask, "Is this the right answer?"

If student responses are limited, then you may not be asking the right questions.


Give students the right answer. 

Then ask questions that guide deeper learning.


Mindshift Article
When asking students to complete a task that has a right answer you may actually be limiting creativity and deeper thinking.  Consider ways to shift the focus from finding the right answer to understanding why an answer is right or how a change would affect the right answer. When you decrease the quest for a 'right answer' you increase creativity and critical thinking.

Many times, math worksheets are a series a of problems for students to solve. Don't forget to show your work to earn all the points! With tools available today [like PhotoMath] students can simply take a picture of a problem and that answer and all the work are provided for them. Look for ways to have students explain, clarify or elaborate their thinking.


Instead of this
Complete the function table


Try this

Version 1 - Record yourself explaining how this rule works and how you know if these answers are right or wrong.
Version 2 - Create a new table where you increase or decrease one of the values in the function rule. 
What decisions did you make to create the new table?
In any subject, try giving students the right answer, then ask them to explain why it is the right answer or how a change would affect the answer. You can also ask them to use the information to innovate and design new ideas.

A science example: 
Go from this: Draw and label the parts of the plant that help it survive grow and meet its needs. 

To this:  Choose one of the parts of the plant that help it survive, grow, and meet it's needs.  Use it as an idea to design something that helps solve a human problem. [NGSS 1-LS1-1]

For more ideas about how to ask the right questions, check out this choice board for #NoWorksheetMonth.  April 2019 is #NoWorksheetMonth and educators all over the globe are going worksheet free and creating authentic learning experiences for their students. Join the movement to give your students a break from canned questions at noworksheetweek.com

Your students will never let you go back to worksheets.

Want to know more about how worksheets kill creativity? Check out this blog post, Autopsy of a Worksheet, by Matthew Weld.